Choose OK to go back to the main screen
Get everything set up for a session to include doing the rough calibration of the receiver. Then Log on for a ten shot session with the new target. Do a few sighter shots and move the hits toward the center but don't worry about them being in the exact center, just somewhere in the middle. Click OK and make sure Dynamic scores, right under the Log off button, is checked.
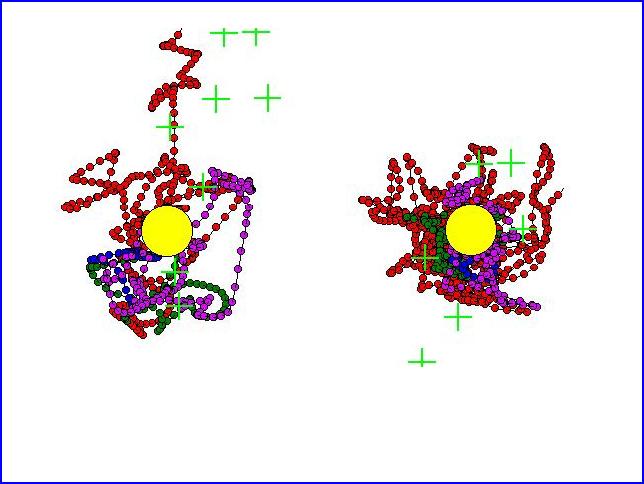
Now you're ready to fire some record shots. Fire one shot with some follow through and then take a look at what you've drawn. There should be a red line (going all over the place) of dots for your initial hold, followed by green and blue for the time just prior to the "click," and purple which shows the time after the "click." You may have to work with your zoom and centering to adjust the trace for review.
The information to note is how concentric all the patterns and shot position are. Don't be concerned about how far out the pattern may seem to be, or where on the screen, which is why there is no bull reference. Try to see how concentric you can make the patterns and shot. I believe the more pure you can make the trigger application, the more concentric everything will become and the better the shots will group when this application is taken to the range.
The area to focus on for this drill is making a smooth, determined trigger operation without regard to the target. A blank card in the transmitter would be great. Pay attention to the sights, but don't let them interfere with the trigger. Make the proper operation of the trigger foremost - proper operation being the determined start to finish movement of your trigger finger in the smooth manner always described.
Take a look at the examples of patterns below. Note how the first one has the shot centered within the overall pattern, but if you look more closely, all the blue and green time (the last second) is below the shot. Next look at the second example. Notice for this one, although not perfect, the shot is more centered within all the colors which are all centered within the entire pattern. IOW, all the portions (colors) are all working toward concentricity.